Hall ignition upgrade...

Bill Calfee

Gun Fool
Hall ignition upgrade...


This is for our SAP ignition friends...

Maybe this will inspire anyone with a Hall RFBR rifle sitting in their closet to think about getting it back into competition.

_________________________


In my opinion...........


If you have a Hall and would like to upgrade the ignition, I would highly advise you to have a schmidt who thoroughly understands rimfire ignition do the upgrade.....OK.

I'm not saying a Hall owner couldn't do it themself........


Properly done, this upgrade will add momentum, and uniformity, to the Hall spring dependent ignition...


_____________________________


First......here's some pictures to study.....then later I'll describe how everything is put together...and modified..


Picture one...

________________________________
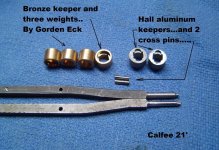

DSC01657 - Copy.jpg

________________________________

The picture above shows an early and late Hall firing pin, two Hall aluminum keepers, and cross pins, and three bronze weights and a bronze keeper that Gordon Eck made for me years ago....

In case I forget to mention it later, the cross pin has to be shortened a few thousandths when using the Eck keeper.....I'm telling you this now while it just crossed my mind...in case I forget to mention it later..


_________________


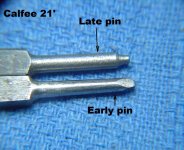
This next picture shows a closeup of the early and late pins........notice there's more meat behind the pin tip of the early pin.....to be able to easily enlarge the footprint....


The late pin is more difficult to enlarge the footprint without moving the entire firing pin forward......

Although, if I had the late pin I'd do whatever it took......this probably really requires the services of a schmidt well versed in rimfire ignition...

_____________________________________
DSC01654.jpg

________________________________


This last picture is where it all comes together, which I'll explain later on....

___________________________________

firing pins - Copy (2).jpg


Your pistol fool friend, Bill Calfee


PS:


Bronze and steel are close to the same weight, which is of course much heavier than aluminum..

But man, if one could get carbide weights......one could wake up the Hall spring dependent ignition even more......


______________________


I need a favor of you CYA folks....

If you have comments about any of this, please withhold them until I get through this thing because it's fairly complicated and needs to be condensed as much as possible......OK.


_____________________


PS #2:


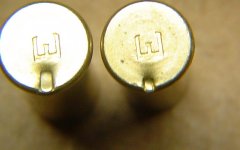
I finally located the picture of an early Hall footprint, right, and the footprint after my modification...left.

An amazing difference.....
Cnv0012.jpg


This picture was taken in November of 2003.....

 
The procedure...

The procedure...


CYA accuracy fool friends:


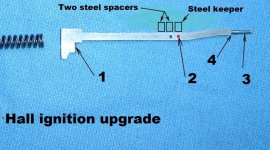
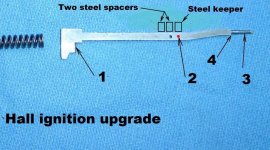
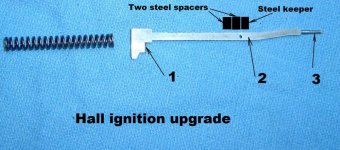
I'm going to describe the procedure for upgrading the Hall ignition by describing what needs to be done for each number in this picture....


firing pins - Copy (2) - Copy.jpg


Plus..........things as they come to mind......none of this is in any particular order...


OK, this just came to mind.....re-installing the firing pin spring on the Hall firing pin is tough to do by hand...


And it's doubly tough to do when the length of an extra weight compresses the firing pin spring even further than the factory length...

But this extra compression is a plus as it gives more case head penetration with the enlarged footprint you'll be driving...


A compression tool of some sort would make re-installing the spring a snap....


Keep in mind, you have to compress the spring, and the keeper, back past the cross pin hole, and at the same time try to insert the cross pin......


I've in the past done it by hand only.....but I wouldn't have the strength to do so today....so a spring compression tool, of some sort, would make it so easy....

Is there such a tool available? I don't know.. it should be easy to make one..


This upgrade is simple, but at the same time complicated if done correctly..


I'll start with number 2.....


The Hall firing pin is not glass hard.....it is heat treated tough......there's reasons for this if I don't forget to tell you about them.....


The cross pin hole can be drilled with common high speed tooling... .062"...


It needs to be centered in the pin, and, placed one keeper width in front of the original cross pin hole....

There's enough room in the loading ramp area for moving the keeper one width further forward...


Therefore, you will wind up with the keeper one width further forward, then a weight in place of the original keeper, and a second weight placed in back of it......

See the picture...


Now, number 1:


When you shorten the pin tip, and reshape it larger, you will need to cut down the cocking teat by a like amount.


This can also be done with files........the cocking teat is tough, not glass hard...


You will need to reshape the cocking teat, which is easier than it would seem.....


The critical side of the rounded front edge of the cocking teat is the side that rides up the cocking ramp..


The other side of the rounded cocking teat front edge is not as critical.....you only need clearance.....


OK, number 4:


When you shorten the cocking teat after shortening and reshaping the firing pin tip, you may have to move the square shoulder, where the rounded pin tip meets the square firing pin body, back some, for clearance in the firing pin hole through the bolt nose.

This can be done with files.....it's not critical, you just need clearance..


OK, my fingers are going numb from typing.....


I'll continue tomorrow.....if the world don't end...


Now................


Some of you folks might be thinking:


"Good gosh, is it worth all this trouble?"


Absolutely...........................it ain't even close....


Your pistol fool friend, BC
 
While it's on my mind

While it's on my mind


CYA accuracy fool friends:


I've got a spearment I want to range test, but, it's too windy, rainy and cold today......

The spearment involves my old 6 groove, oversized slave Lilja....


This is the barrel I had on my triple lug spearment back on March 26th, of 2014.....that showed me the future belongs to MD-PAS triple lug actions.....


Anyway....


Two things about the Hall, while they're on my mind before I forget to mention them:


I believe the Hall firing pin is EDM wire cut......


Which leaves the four corners of the pin pretty sharp....


The four sharp corners need to be ever so lightly rounded...


You can't go wild doing this.........you don't want to make the spring fit any looser than at all possible..


Just touch them with a medium stone, or, some 600 wet or dry paper around a small file.....


Another thing before I forget it....


The Hall actually has one advantage over SAP ignition actions that have the firing pin pass through a threaded bolt shroud....


The Hall pin does not pass through a threaded bolt shroud.....


It is guided by a "pusher" that is pinned to the breech bolt body...which is similar to the late 54 Anschutz and the Suhl..

The pusher of the 54 being retained with a threaded end cap and the Suhl retained bayonet style..


So the Hall firing pin doesn't have to deal with the alignment issues that plague all SAP ignition actions where the firing pin passes through a threaded bolt shroud...


Oh..........just thought of one other thing...


When you're developing your ignition upgrade, you need to use a very light rate slave spring, the same diameter as the Hall firing pin spring, so you can easily assemble and disassemble it by hand......


Cause you will be assembling and disassembling the firing pin and spring several times....


Oh, just thought of something else....


This is important.....


Shorten the firing pin tip and reshape it, then shorten the cocking piece to match, and cut back the square end of the pin just behind the round section, for clearance through the breech bolt nose.....

Before................

You drill the new cross pin hole to move the keeper one keeper width further forward on the pin..


This way you can make sure you have clearance to the loading ramp....


Then you can adjust the location for the new cross pin hole accordingly...if needed...


This is all I can think of, for now.....


Your pistol fool friend, BC

firing pins - Copy (2) - Copy.jpg

Knock those four sharp corners off the pin.....but don't go wild doing it.....OK
 
Doing it's one thing, telling others how another...

Doing it's one thing, telling others how another...


CYA accuracy fool friends:


It's one thing to upgrade the Hall ignition, but, I'm finding it's another thing to instruct someone else how to do it...


Anyway, I said I'd do this thing, so I will, although it may take some time.....


I love to spearment.....


So I got to thinking.....


You know, the Hall action is ripe to be converted to triple lug......


I've got several sets of the 10-X triple lug collars, the good 4140 version, not the stainless originals..


The Hall has a .700" diameter breech bolt, but, that wouldn't be a handicap, at all, to using the 10-X triple lug collar.


The only thing I do not remember about the Hall, is the diameter of the tang that the locking lug collar rides on at the rear of the breech bolt....


I would suspect that it's .500".........like the 10-X....


Anyway..............


With my ignition up-grade, and converting a Hall action to three lug, even keeping it 12 ignition, I have no doubt I could build a SAP ignition contraption that would run with any SAP ignition contraption in existence....


The downside, obviously, is that it'd still be a SAP ignition contraption....


I'm a dreamer........sometimes a foolish dreamer......


I'll get back to the ignition upgrade, soon....


Your pistol fool friend, BC
 
I was lying in bed last night pondering....

I was lying in bed last night pondering....


CYA accuracy fool friends:


I was lying in bed last night pondering about converting a Hall action to triple lug.......


As long as the tenon at the rear of the Hall breech bolt is the same diameter, or larger, than the hole through the 10-X triple lug collar, it can be done....


If the tenon on the Hall is smaller than the hole through the 10-X triple lug collar, it would be a tough conversion...


Actually, I wouldn't attempt it....


I have absolutely no doubt that with my ignition upgrade, and converted to triple lug, the Hall would run with any custom SAP ignition RFBR action.....


Actually, it would probably outrun them....


Because the Hall firing pin is not handicapped by passing through a threaded bolt shroud....


The Hall firing pin simply floats between the pusher and the ID of the breech bolt body....


In other words, when you unpin the pusher and turn the breech bolt rear end down, the firing pin assembly simply falls out..


This is exactly what happens when you unpin the firing pin from a MD-PAS ignition action and turn it rear end down......the firing pin simply falls out...


Your pistol fool friend, BC
 
Pictures....

I was lying in bed last night pondering....


CYA accuracy fool friends:


I was lying in bed last night pondering about converting a Hall action to triple lug.......


As long as the tenon at the rear of the Hall breech bolt is the same diameter, or larger, than the hole through the 10-X triple lug collar, it can be done....


If the tenon on the Hall is smaller than the hole through the 10-X triple lug collar, it would be a tough conversion...


Actually, I wouldn't attempt it....


I have absolutely no doubt that with my ignition upgrade, and converted to triple lug, the Hall would run with any custom SAP ignition RFBR action.....


Actually, it would probably outrun them....


Because the Hall firing pin is not handicapped by passing through a threaded bolt shroud....


The Hall firing pin simply floats between the pusher and the ID of the breech bolt body....


In other words, when you unpin the pusher and turn the breech bolt rear end down, the firing pin assembly simply falls out..


This is exactly what happens when you unpin the firing pin from a MD-PAS ignition action and turn it rear end down......the firing pin simply falls out...


Your pistol fool friend, BC


__________________________________________________


Pictures......


CYA accuracy fool friends:


Here's a couple of pictures...


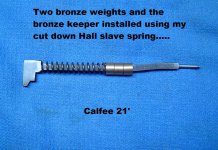
This first one shows the final assembly of the ignition upgrade.....with the two bronze weights and bronze keeper..

In my collection of Hall springs I found my old slave spring.....I made it by cutting down a Hall spring...

It's very difficult to install the Hall spring, keeper and retaining pin, by hand...

This shortened slave spring makes it easy, cause you'll be taking it apart and re-assembling everything several times during the upgrade......


DSC01658.jpg


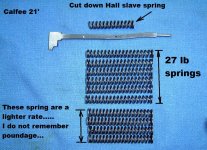
Here's some Hall springs....


The ones marked 27 pounds are that.......


I do not remember the rate of the lighter Hall spring...


DSC01662.jpg


CYA friends, you need to keep something in mind...


Two things:


The 27 pounds is the rate at the compressed length when using the single, aluminum Hall keeper...


You will gain on that rate with the additional compression caused by the additional weight behind the original Hall keeper location....


And second....


Remember, the Hall ignition is totally spring dependent.....

Which means the spring does probably 90% of the work......


Which is what we're trying to get away from with this upgrade, while at the same time driving a much larger footprint.......


Cnv0012.jpg


Your pistol fool friend, BC


____________________


PS:


The 27 pound Hall spring has no relationship when compared to a 24 pound Pepper spring in the Turbo.

The poundage is determined at two different compression lengths...
 
So you'll know what I'm talking about....

So you'll know what I'm talking about....


CYA accuracy fool friends:


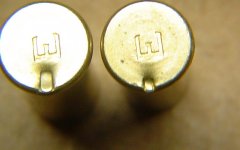
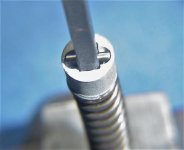
In case any of you folks have never seen how the Hall firing pin spring is retained, here's a picture...


This picture is of the Hall aluminum keeper with the cross pin installed...


DSC01663.jpg


Holding the keeper back and trying to install the cross pin by hand is tough to do....


Even more so when you add the additional spring compression from the weight installed back of the keeper.


This is why a tool is probably necessary to do this job.......


Years ago I even installed my upgrade by hand......them days are long gone for me.....don't have the hand strength any longer....


Your pistol fool friend, BC
 
Back
Top Bottom